Monday, May 30, 2011

Thinking of You

Something a little different.
The square die cuts are from Spellbinders new
Fleur de Lis squares.

Lots of sponging and 3-d layering.
Shapes are either die cut or punched.
Textures were done with several embossing folders.

Since I will be frantically busy as of tomorrow until at least
the 12th of June there are going to be several weeks without
posts. Probably won't be doing much card designing either.
Just working real hard on the job
and maintaining sanity.

Saturday, May 21, 2011

Inscribed On The Palms of His Hands


This has to be one of my very favorite scriptures.
For this card I used PSP X to layer by layer
create the scripture. It was then cut out with
a Spellbinders die. Pale pink ink was sponged around
the edge of this die cut and the inside and outside
of the frame.

Punch Bunch punches were used for the flowers and leaves.
The flowers were shaped with a rounded tool.
Stickles pearl was used for the centers of
the flowers.

Note that the embossed bottom layer has
been sponged with the pale pink ink as well.

The scripture and the frame have been raised
off the card using layers of paper egg carton.
This creates a stunning 3-d look that is
far more pleasing to the eye than
simply attaching the pieces to the card front.

Friday, May 13, 2011

Precious LIttle Girl


Begin with a white A2 card base.
Now take a Sizzix embossing folder
and cut the textured white card stock
to 4 x 5.25 inches.
Lightly sponge with a pale pink ink.
I wanted the embossing to show ever so slightly.
Attach it to a dark mauvey-pink
card stock and trim to a narrow border.
I use Perfect Layers rulers to get
exactly the same width with every cut.

The stamped image is from an old
company called Second Star On The Right.
I don't know if they are even in business anymore.
I purchased several sheets of unmounted
rubber from them about 10 years ago.
I used glossy paper and Rangers Archival
coffee ink to stamp this precious little girl image.

The oval within an oval frame was made using
two Spellbinders oval dies at the same time.
Position as the ovals are shown on the card.
Leave the dies attached to the paper after cutting
and emboss with the soft rubber embossing mat.
Sponge a soft pink ink on the outer and inner ovals.

Use one of Spellbinders Fancy Tags 3 die cuts
that has been cut in half to make the
flourish on the thick side of the oval frame.
I cut a small part off on each end to get
just the right look.
Sponge with the same pale pink ink.
Attach to the wide side of the frame.

I use the flat parts of paper egg cartons for my
3-d effect. This design has two layers
of egg carton to get a more dramatic look.

The pale green flourishes are from Bosskut.
The very pale pink flowers are from Punch Bunch.
As you know by now I really like Punch Bunch.
They have a very good product, their punches
always punch clean and seldom stick.

Thursday, May 12, 2011

A Rainy Day


A beautiful rainy spring day in western Nebraska.
Our average yearly rainfall is 15 inches.
That puts us in the semi-arid category.
At 7 this morning we had 1.11 inches of
wonderful healing rain.
At times there are huge snowflakes
drifting down.

This is the view from my covered deck.
I look out every morning and my heart swells
with praise to God. He has created such
beauty for us to behold.
These slow drizzly spring rains are perfect.
Not a drop of rain is wasted. It all
soaks in and heals our dry parched land.
Most of the corn has been planted and
the farmers have been worried that
there would not be enough moisture
to get it "up". Up - as in germinated.
Our pastures were so very dry and
the wheat was starting to show some stress
from lack of moisture.
Thank you Lord for this spring blessing.
Your people are grateful
for your lovingkindness and favor.

Tuesday, May 10, 2011

Another Birthday Card


Pale pink and white with a touch of very
soft green is the color scheme for this card.

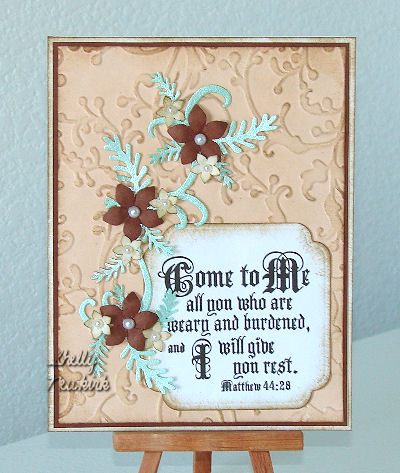
A Sizzix embossing folder was used to create
the textured lower layer. It was placed over
pale pink and trimmed to a very narrow
border with a Perfect Layers ruler.
The above combination was attached
to a white card base.
(A2 or 4.25 x 5.5 inches, aka quarter fold card)

To cut the frame for the phrase I used
two Spellbinders dies at the same time.
I place the Label die cutting side down on
the paper, then placed the oval inside.
These were taped down with masking tape.
Destick your masking tape by smooshing
it on your arm several times to reduce
the level of adhesiveness.
If you don't do this, when you remove the tape
the top layer of paper will come off with the tape.
Run the combined dies through your die cut machine.
DO NOT REMOVE THE TAPE!!!!!
Take the whole thing and place
it cutting side down on an embossing mat
(soft rubber sheet) and emboss.
Now you can take it apart
and see your lovely frame.

I sponged the inside and outside edges of the frame very
lightly with light pink ink.
Double layers of egg carton were attached
to the back of the frame.
The frame was then attached to a
light pink piece of card stock and
the oval cut Happy Birthday was centered in the frame.
I put a single layer of egg carton on
the back of the phrase.

The flowers and leaves were punched
with Punch Bunches fantastic punches.
Flowers were shaped with a
extra large stylus type tool.
Gently rub the petals and center of the
flower until it "cups" around the tool.
Now flip it over and press in the center.
I used Rangers Liquid Pearls (white opal)
for the flower centers. Stickles or adhesive backed
rhinestones or pearls can also be used for the center
of the flowers.

TIP - recycle and reuse,
cut up the flat pieces of your
paper egg cartons for creating
3-D effects

Saturday, May 7, 2011

I Am Your God


Sizzix embossing folders provided the texture
for the peach covering the card base and the
peach squares.
Now the white portion of those two squares
are from cut with Spellbinders new
Fleur de Lis Squares. Just lovely. I
know I am going to be using these a lot.

The scripture was done in PSP X and cut
out with a Spellbinders Label die.

The butterfly is two different punches with
the larger butterfly run through with an
embossing folder for that textural look.

Flowers and ferny type leaves are Punch Bunch
and the barely visible flourish is from Bosscut.

Just about everything on the card has been sponged to
add depth.
The squares, scripture label and butterfly have had
tiny cut up pieces of paper egg carton attached
to the back to create a 3-D look.
I put little pieces under each of the butterfly
wing layers to keep those wings separate
and 3-D even after mailing.

Friday, May 6, 2011

Because I Care


The Quickuts butterfly is stunning with just the top layer
of the die cut over the Spellbinders Lacy Square.

A Sizzix embossing folder was used to make the
white textured base layer. A narrow border of
pale peach under it accents the color theme.

The Spellbinders Lacy Square has a center
or pale peach.
That lovely butterfly really stands out
with the rhinestones attached to the body.

The phrase was computer generated
and cut with a Spellbinders oval and
attached to a tag from their first
Fancy Tag set.

Thursday, May 5, 2011

A Birthday Card


The same Sizzix embossing folder was used for
the white and the peach texture.
Spellbinders Beaded Oval die,
one of the Fancy Tags 2 and
Oval and Scalloped Oval are
the dies used to create this card.

Bosscut made the delicate flourish under
the Punch Bunch flowers and leaves.
A pale green metallic paper was used for the leaves.
The flowers have been painted with Lumiere
metallic paint, shaped with a rounded tool from Punch Bunch
and pearls attached to the centers.

The beaded oval is elevated over the card base as
is the tag. I use paper egg carton cut
up to the perfect size and glued to the back
of the oval and the tag.

Tuesday, May 3, 2011

Today's Card

Not much explanation today.
I had cataract surgery early this morning
and doing this one eyed is a little difficult.

There is a lot of details of how I do this type
of card in previous posts.
Enjoy!

Monday, May 2, 2011

Come unto Me


Love this new Sizzix embossing folder!
It is the bottom textured layer.
The narrow dark reddish brown bottom
layer is the same paper that was used for
the large punched flowers.
The texture was lightly sponged to
make it stand out a little more.

The phrase was computer generated in PSP X,
cut out with a Spellbinders Label
and the edges lightly sponged with brown ink.

The two sizes Punch Bunch fern type leaves and
the Bosscut flourish are
cut from a light green metallic card stock.

The smaller Punch Bunch flowers are
white card stock and the edges
were sponged to make them stand out a bit.
Pearls were glued in the center of each flower.
I have discovered that the adhesive on these
lovely little embellishments doesn't hold very well
and have started to just glue them in place.

Saturday, April 30, 2011

With Sympathy


Layers, embossing folders, punches and die cuts.
Ahhhh....so much fun!

The die cuts are from Spellbinders and Bosscuts.
The punched flowers are Punch Bunch
while the butterfly punch is unknown.

The same embossing folder was used for
the white and the peach texture.

The bottom layer -
Cut the white texture to 5 1/4 x 4 inches,
attach to peach cardstock and
trim to a narrow border with Perfect Layers ruler.
Attach to card base.

Cut two different sizes of Spellbinders
beaded ovals. Now cut ovals that fit
inside the beaded ovals from
peach card stock.
Texture the peach ovals in the same
embossing folder that was used for
the white textured layer.

I used cut up paper egg carton to
get the 3-D look on the ovals.

Fancy Tag 1 was the die cut used for the
base of the phrase.
Mega Oval die cuts plain and scalloped from
Spellbinders were used to cut the phrase
and the peach scalloped layer under it.

Bosscuts is the maker of flourish die cut
in the center of the largest oval.

The Punch Bunch flowers are
made from silver Lumiere painted
white card stock.
For extra sparkle - sprinkle with
glitter while the paint is still wet.

Friday, April 29, 2011

Prayer is a Shield - 2


The card base is a light blue parchment card stock.
The edges have been sponged with dark brown ink.

The scrapbook paper is from g.e.d, the
Ella Blue stack.
Dark brown card stock, a Karen Foster Designs
brown vellum and silver Lumiere painted
white card stock complete the list of paper used.

A Spellbinders Borderibilities die cut was
used on the lower half of the horizontal
bottom layer. The upper half
of this concoction is a carefully cut
piece from a striped page of the
scrapbook paper stack.

The computer generated phrase was
cut with a Spellbinder Label die, then
layered over another Label die cut.
Lowest layer is dark brown card stock
that has been trimmed to a narrow border
using Perfect Layers rulers.
The corner were then rounded.

Those lovely leaves are Karen Foster brown vellum.
I regret to inform you that this vellum has been
discontinued. It was some of the very first
that the company came out with.
I used VersaMark ink and brown embossing
powder, then carefully cut them out.

The flowers are made from double layers
of silver Lumiere painted white card stock,
that have been punched with a
Punch Bunch punch.
If you are looking for flower punches
I would highly recommend Punch Bunch.
They have multiple designs in many sizes.

Thursday, April 28, 2011

The Path of Life

Very simple and basic designs.
The papers all came from the same unknown stack.
The flowers were created by using a stipple brush
and dark blue Lumiere's paint to cover a
scrap of blue card stock.
After it was totally dry it was
punched with a flower shape punch
from The Punch Bunch.
It was then shaped from the back with a rounded tool
on a mouse pad, turned over, pressed in the center with
the tool and precious jewel added.
OK, just cheap bling-bling, but it looks great.
Each flower has two layers.

The dark brown branches are also from a punch.
They were added whole or in pieces, whatever
it took to make it look right.

The scripture has been created in
Paint Shop Pro X by me.
They have been cut out with
Spellbinders Labels.

Wednesday, April 27, 2011

I will answer you


The texture is an embossing folder. I used the same one
for the white and the purple.
The scripture has been constructed in PSP X.
It was cut out with a Spellbinders oval die, mounted on a
Spellbinders Fancy Tag and those two layers
were then attached to Spellbinders oval cuts as well.

Saturday, April 16, 2011

Be Exalted O God


Background paper for this card is a discontinued
Karen Foster Designs. It was some of the very
first paper that the company came out with.

The elaborate dimensional flourishes are from
several Quickuts dies.
The edges have been sponged with a
light brown ink.
I used tiny pieces of egg carton for the
3-D look. I didn't want the thicker foam
3-D, it was too extreme.
There are three layers of flourish
and the phrase is the fourth layer.

The phrase is Psalm 108:5.
I computer generated it in
Paint Shop Pro X.
A Spellbinders oval die was used to cut it out.

Wednesday, April 13, 2011

Call To Me and I Will Answer You


Layers and layers and layers.
Begin with the PSP X generated scripture
that is cut out with a Spellbinders Label.
Layer on this on a dark purple rectangle that
has had the edges rounded.
Glue paper egg carton to the back
and attach to next layer.
Next layer down:
The Big Scallops Square Spellbinders die cut
has been textured in an embossing folder.
Attach to dark purple card stock,
I used perfect layers rulers to cut a narrow border
and then rounded the edges.
This is layered over a Lacy Square.
Attach more paper egg carton to the back.

The flowers and butterfly have been painted silver with
Lumiere Silver and punched out
with a Punch Bunch punch.
They have been shaped with a smooth rounded
tool that is gently rubbed on each individual petal or wing.
When the flower cups around the tool you
turn it over and press in the center.

Bosskut flourishes have been cut apart
and strategically placed for most pleasing effect.
I did place some small pieces of egg carton under the
flourish on raised part of the card
to make them stand out.
I also attached tiny bits of egg carton in
the cupped part of the wings to maintain
the shape.

The lavender paper that is under everything
is one of the original Karen Foster Designs papers.

Sunday, April 10, 2011

Two Cards Today


I am home and not feeling the best,
just hoping it is not something that my
huband will catch!

The above sympathy card is similar to others
I have already explained in previous blogs.
I love the lavender and white combination.

A very simple and elegant design.
The scripture in the center
is my own creation in PSP X.
The scripture layer and the lavender
layer under it have been cut with
Spellbinders labels dies.
Karen Foster is the company
that made the patterned paper.
You are going to have
to explore previous posts to
find out how to create the
3-D effect.

Monday, April 4, 2011

Call to Me


The background paper is some old purchases
from the very first designs by Karen Foster.
I still love them, even if they are discontinued.

The phrase has been created by me in
Paint Shop Pro X and is from Jeremiah 33:3
in the Holy Bible, NASB version.
It was cut out with a Spellbinders Label,
attached to a lavender card stock
and a narrow border cut using
one of the Perfect Layers rulers.


I rounded the corners
on the embossing folder textured white square.
The lavender square was cut with a Big Scallops
square from Spellbinders.
The scripture layer was then attached to
these layers.

The lovely white scrolly thing under the scripture layers
is from a Martha Stewart EK Success punch.

The leaves are a Karen Foster green vellum.
The unknown leaf stamp was stamped
in Versa Mark and a moss colored
embossing powder was applied.
Then they were cut out by hand.

The flower is a punch from Punch Bunch.
After punching I placed the flower in the
palm of my hand and with a rounded ball type
tool (available from Punch Bunch) I gently rubbed
the center of each petal until they curved.
When the entire flower had been textured with
the tool it kind of curls up and around the tool
when you rub in the center of the flower.
Now I turned the flower over and
pressed the tool in the center of the flower.

The flowers were painted with silver Lumiere
and glitter was sprinkled on while they were
still wet.
My husband noticed the glitter on my face. LOL!
The two flowers were glued together with the petals
offset to create a more textured look.

The butterfly is from and old, old punch that
I got when I first started stamping.
That was almost 20 years ago.
I textured it with the tool by rubbing
the wings to get them to curve.
The butterfly was then painted with
grape Lumiere and sprinkled with
clear glitter while still wet.
A half pearl was place in the
center of the flower.

The leaves, flower and butterfly
were then place on the card.

Saturday, April 2, 2011

Prayer is a Shield


Various scrapbook paper are used on a dark brown
card stock background.
Spellbinders dies were used for
all the shapes except the flowers
and the leaves.
The phrase is a computer generated
creation of my own, using PSP X.

The leaves have been stamped and
the embossing powder heat embossed
on brown vellum.
The color of the vellum and
the texture from the embossing powder
meant that I didn't have to use special adhesive.

The flowers are from a Punch Bunch punch.
Each petal is textured by hand and
the two layers are then glued together.
This group was highlighted with
a clear Stickles glitter glue.

Adhesive backed half pearls
are used for the center of the flowers and on the
lower right hand corner.

Friday, April 1, 2011

Embossed Ovals


This is such a delicate card.
The original idea was
CASED from my long time stamping pen pal
Celia Magro. She is a super stamper
and sends me cards that challenge and inspire me.

Begin by layering a 4 x 5.25 inch white
embossed piece of card stock over a light
pink card stock.
I used my narrowest Perfect Layers
edge to cut the perfect layer.

Cut and emboss the two sizes of pink ovals
using Spellbinders Beaded Ovals dies.
Then cut the coordinating ovals that
fit inside the beaded ovals from Spellbinder
nesting ovals.
Now emboss those ovals in the same
folder that you used to make the white
embossed layer.
Attach the pink embossed ovals
to the center of the white beaded ovals.

The smaller oval layers are positioned in
the lower right corner of the card.
The larger oval layers have been make
to stand out from the card with 3-D foam.

The flower and butterflies have been
punched from a pearlized white card stock.
Some clear Stickles was added to both.
There is a adhesive backed rhinestone
in the center of the 2 layer flower.

Bosskut made the flourish which
has been cut from plain white card stock
and attached to the largest of the ovals.

The Spellbinders tag has also been cut from the
pink card stock.
The phrase is computer generated and
was sized at the time of creation to fit this tag.

Leave some comments and let
me know how your version of this
card turned out.