Saturday, August 31, 2013

Sympathy

White, beige and tan, a very subdued and elegant card.
The flowers are craft card stock and DP.
The corners were die cut.
Centers of the flowers are a brown Viva Pearl Pen.
The stamped phrase (Stampendous I think)
was cut in a rectangle and the corners rounded.
The beige DP layer under the phrase was
trimmed with a layering ruler and the corners rounded.

Friday, August 30, 2013

Little Card

 The computer generated phrase is available to you free.
Look on the right side of the blog under Ready to Print Freebies.
Papers used are from DCWV Citrus stack and 
Citrus card stock stack.
The little accents are made using a Viva Pearl Pen.

Monday, August 26, 2013

Call To Me


Call To Me

Classy Cards products used


1.  Place a piece of 5.50 x 4.25 inch white card stock in Spellbinders Whimsy embossing folder.
2.  Very lightly “kiss” only the raised portion with a sponge inked with a light brown or tan ink.  In this case I used CTMH Bamboo.  Attach to an A2 plain white card base.  (A2 = 5.50 x 4.25 inches, also called a quarter fold)
3.  Now position Spellbinders Label 29 in the exact center of a 5.50 x 4.25  inch piece of white card stock, tape into place, cut and then emboss with the rubber mat.
4.  Lightly sponge the outer and inner edges of the newly cut frame with
     the same ink used on the embossing folder piece..
5.  Since I like the 3-D effect I have attached cut pieces of flat from a
     paper egg carton to the back the frame.
6.  Attach the frame to the card base.
7.  After lightly sponging your greeting with the same tan or brown ink,
     it too is 3-D’ed with flat piece of egg carton and glued inside the frame
     and over the embossed piece.  In this case the greeting is a scripture
     that I have created in PSP X and cut with a Spellbinders Nesting
     Rectangle.
8.  With plain white paper again, cut one of Cheery Lynn Designs butterflies
     and the angel wings that go under the butterfly.
9.  With that same tan or brown ink heavily sponge the angel wing (liner) and
     lightly sponge the edges of the butterfly.
10.  Position the butterfly “artfully” on the card front.

Notes and comments – the same ink is sponged on all the pieces used in the design.  The design can be made totally in white with no sponging, but for my purposes here the sponging really helps show the layers and embossing.

The embossing with a rubber mat is not a must with the frame, but I find that it is one of those little touches that really adds a classy look the finished product.

Please visit Classy Cards N Such to purchase items shown on this card.  This card and other great designs can be found on the Classy Cards N Such blog.

The scripture is available to all who view my blog for FREE.  Check out the Freebies to Print on the sidebar to the right and just click on the freebie you would like to print.

Thursday, August 22, 2013

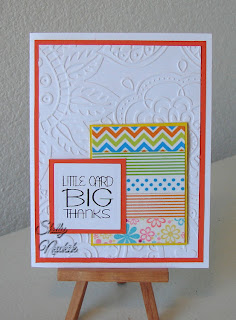
Playing Washi Tape

 Here are two examples of using Washi Tape.
As you can see there is an embossed layer that
is the first layer on the white card base.

The rectangle that is cover with Washi Tape is
raised over the card using flat pieces of paper egg carton
to create a 3-D effect.  

The phrase is computer generated.
Here is a link to the Word document that will allow
you to save this phrase and print it up to use.

The phrase is also 3-D.
I like both versions of the design.

Wednesday, August 21, 2013

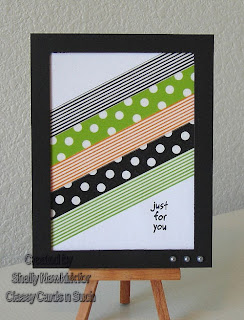
Using Washi Tape


Washi Tape

Classy Cards products used
Washi Tapes  (all “Trendy” or Washi tapes are found in embellishments)

1.  Begin with a basic white card base.
2.  Cut a piece of white card stock slightly smaller than the card front.
     About 5.25 x 4 inches.
3.  Place Trendy Tape on the piece of card stock at an angle.
     Leave space that is “untaped” at the upper left and lower right corners.
     The ends of the tape can be folder over the edge of the paper or cut off.
4.  A small greeting can be stamped in either of the above corners.
5.  Attach to the card front.
6.  Cut a piece of black card stock the exact same size as the card front, which
     is 5.50 x 4.25 inches.
7.  Using one of the Spellbinders Matting Basics dies create a simple frame.
     Place the die in the center of the black card stock and cut.  The size of the
     die will determine the width of your frame.  The smaller the die the wider
     the frame.
8.  This step can be skipped if so desired.  I like the 3-D effect created by
     attaching flat pieces of egg carton to the back of the frame. 
9.  The frame goes over the Trendy Tape (also known as washi tape) piece
     that is attached to the card front.
10.  On the lower right corner of the frame attach three small gun metal
       pearls.


Friday, August 16, 2013

The Lord Goes Before You


The Lord Goes Before You

Classy Cards products used in this design

1.  Cover the plain white card base with a soft colored DP that has no distinct
      pattern.
2.  Position a Spellbinders Label on white card stock.  Tape in place with low
     tack masking tape.  I used Spellbinders Label 9, but any Label die will
     work.
3.  Place a Spellbinders Oval die inside the Label.   Tape in place.  Cut.
4.  Do not remover the tape, but place the soft embossing mat under the dies
     and emboss.  You could also place the frame in an embossing folder for a
     different look.
5.  Turn the frame over and on the back side attach pieces of flat egg carton
     to create a 3-D effect.
6.  The scripture has been computer generated.  Die cut it using the oval die
     that is just enough bigger than the oval aperture to hide the edge of the
     oval.
7.  Sponge the edges of the oval scripture with a Distressed Ink that will
     coordinate with the DP that is covering the card base.  In this case it is
     a purple ink was used.
8.  Attach the frame to the scripture oval.  Center it on the card.
9.  Die cut 2 Anja Leaves and position where desire on frame.
10.  Add several flowers that will coordinate with your DP and sponged ink.
11.  Use a Viva Pearl Pen to put lovely centers in the flowers.


Sunday, August 11, 2013

Easy Framed Foliage Card


A very simple framed card that is so easy
to make.  I have used Spellbinders


Above you see how I arrange my dies for the
frame.  I have two examples using the Matting
Basics.  The first is slightly wider and has been
textured in a Spellbinders M-Bossabilities EL-009
Flora embossing folder.

The other frame has been embossed using
the Matting Basics dies themselves.
I leave the low tack painters masking tape
on after die cutting and run it
through the die cut machine again, using
the soft rubber embossing mat.


Once the Spellbinders Foliage leaves have
been cut and embossed I use the flat
portions of paper egg cartons to create
a 3-D look.  You can cut that egg carton
to any size AND you are recycling.  It’s fast,
easy and makes your husband look at you
strangely. (oh dear, what is she up to now?)


The foliage die cut on this card is from

The background is made with Glimmer Mists
and a stencil.

Please visit Classy Cards N Such to purchase these products.
For more great ideas Classy Cards N Such has a blog.
It has fantastic ideas that will spark your creativity.


Thursday, August 1, 2013

MacDuff, the Scottie

Our dog is a Scottish Terrier.
His name is MacDuff.  He is a
great little dog with a big voice.
He is also a great watch dog.
Mac Duff will even let me cuddle him on special occasions.

This card began with a white card base that
has the front covered with black card stock.

Now take another piece of white card stock (4. x 5.25 inches).
Punch along the a long edge with EK Successes Doggie Paws
border punch.

I found some Christmas Washi Tape on sale and in plaid.
Oh my, perfect for my Scottie Dog cards.
So place the washi tape on the white card stock with 
the punched edge.
I cut the tape a little long on both sides
and folded it over to the back of the card stock.
It just gives a subtle look that is more finished.
I happened to find some narrow black washi tape, but you 
could use black text weight paper.
This narrow black borders the plaid on either side.
Now place this whole washi taped white piece
with the paw print punched border 
on the card front.

I happen to have a Scottie dog die cut.
so Mr. MacDuff is die cut in black.
I used a black Viva Pearl Pen for his
eye and a silver Viva Pearl Pen for his collar.
I really like how the pearl pens hold their shape
and their shine.  They are also great for embellishing
as pearls and flower centers.

I cut a white oval and then a slightly larger red oval,
layered the white over the red
and centered MacDuff on them .
A 3-D effect was created by gluing the flat
parts of paper egg cartons to the back of the ovals.

Just barely visible in the photo on the
lower right edge of the plaid washi tape
are three "pearls" created with
a black Viva Pearl Pen.