Showing posts with label Spellbinders Labels. Show all posts

Wednesday, January 25, 2012

Adding flowers to a design


These three design are basically the same. The variance
is the in color and placement of the flowers
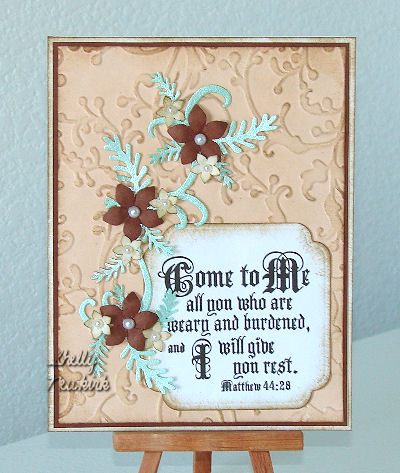
and the Spellbinders Labels used.
The peach and pink flowers were punched from
card stock, while the lavender flowers are from vellum

The card base is covered with a textured piece the exact
size of the card. I used an embossing folder to achieve this texture.
The centers of the flower on the textured pieces
have been accented with various glitter glues.

The scripture was computer generated in PSP X.
The scripture is raised over the lower label layer
with the flat pieces from a paper egg carton.

The flowers were shaped using a large stylus.
I rubbed each flower gently until it cupped around the stylus.
Then the flower was turned over and I again used
the stylus to press in the center.
A tiny sun punch was used for the center on two of the
cards. Again, just rub gently with a smaller stylus until
the paper cups around the stylus, then attach to the flower.

The peach flowers have a pearl product by Stickles in the
center of them. I am not wild about this method. The stuff
goes flat and just sits there and looks pearlie, not at all like
a flower center. ; )

Monday, May 2, 2011

Come unto Me


Love this new Sizzix embossing folder!
It is the bottom textured layer.
The narrow dark reddish brown bottom
layer is the same paper that was used for
the large punched flowers.
The texture was lightly sponged to
make it stand out a little more.

The phrase was computer generated in PSP X,
cut out with a Spellbinders Label
and the edges lightly sponged with brown ink.

The two sizes Punch Bunch fern type leaves and
the Bosscut flourish are
cut from a light green metallic card stock.

The smaller Punch Bunch flowers are
white card stock and the edges
were sponged to make them stand out a bit.
Pearls were glued in the center of each flower.
I have discovered that the adhesive on these
lovely little embellishments doesn't hold very well
and have started to just glue them in place.

Thursday, March 24, 2011

Behold


The scripture phrase has been crafted in PSP X by me.
It was cut with a Spellbinders Label, then
layered onto two ovals, also from
Spellbinders dies. Then layer those over another
Spellbinders Label die cut. This bottom layer
has the edges lightly sponged with
Ranger's Archival Coffee ink.

Now for those leaves.
Using VersaMark, I stamped the leaf
on brown vellum. The leaf stamp manufacturer is
unknown, the vellum is by Karen Foster.
A chocolate brown embossing powder was
applied and after carefully heating, the
leaves were cut out.

The flowers are a Punch Bunch punch.
I sprayed them with my own recipe of
silver PearlEx, gum arabic and water.
After they had dried they were hand shaped
with a smooth rounded small eraser size tool.
On a mouse pad, fun foam or the palm of your
hand you can gently rub in the center of
each petal until they curl.
After each petal has been shaped,
turn the flower over and press in the center.

Two flowers were glued together,
making sure the petals alternated.
Now a half pearl was placed in the
center of each flower.
Additional pearls were used to
the left of the phrase.

Monday, November 22, 2010

Autumn


I had some dry embossed pieces left over from
another card design and just hated to throw them away.
So three of them were cut the same width
and the corners on one end rounded.

The card base is covered with paper from the
same stack as the printed paper that is under
the computer generated phrase.
The corners on the card base have been rounded
and then the edges sponged with
dark brown ink.

The phrase is cut out with a Spellbinders Label
and it and the layer under it have been sponged.

The silk leaves are from Michael's store brand.
The colors are so lovely, I just had to buy them.
Three pearls were attached to the joining
point of the two leaves.

Saturday, November 6, 2010

Ecclesiastes 3:1


A plain white card base is the start of this design.
I used acrylic flourish stamps by Basic Grey,
inked with a light brown.
The entire card front was stamped with the flourishes.
I wanted a very soft subtle background.
This is barely noticeable.

The scripture is a computer generated image.
It has been cut out with a Spellbinders Label die.
Next cut another Label in scrapbook paper.
On coordinating card stock,
I drew around the outer edge of that same Label
and cut it out. This resulted in a slightly larger label,
but not as large as the label that is one size larger.
I wanted a narrow border around the label
and this gave me exactly what I wanted.

The edges of the scripture label and the
scrapbook label have been sponged with
dark brown ink.

With a matching piece of scrapbook paper,
create a strip that will cover from the top
to the bottom of the card.
The width should be what looks best to you.

With a border punch and the coordinating
card stock, punch two border the
length of the scrapbook strip.
Attach the borders to either
side of the strip.

Now put your card together as shown in the pictures.

Wednesday, October 27, 2010

Thanks

A huge thanks from Morning Star Stamps,
stamped in dark green with a lighter green
leaf border stamp from Art Impressions behind it.
It is all cut out with a Spellbinders Label.

The card base is covered with scrap book paper
that has been sponged with dark green ink.

The finishing touch is a dragonfly brad.