Friday, December 13, 2013

Christmas Explosion On My Deck

 My husband does not like all the fuss that
accompanies Christmas.  Well he left with our 
son to spend a couple of days with the daughter.
So I let the Christmas elves and all their 
decorations out of the closet.
Three trips down the cedar tree row to trim boughs 
off trees, elk and deer antler sheds
and goodies from the Christmas storage box ended
with my deck looking like Christmas.  
Ho, ho, ho!!!!!

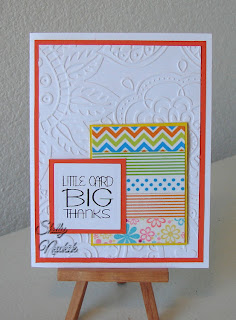
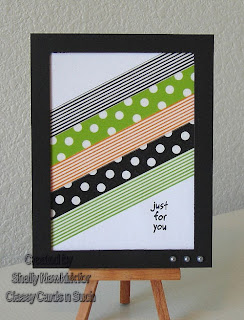
Using Washi Tape

 The washi tape is a gorgeous floral from 
Classy Cards N Such.
Layers, textures using embossing folders,
and sponging are techniques used.
The label layers are raised using the flat pieces of
paper egg cartons.

Tuesday, November 26, 2013

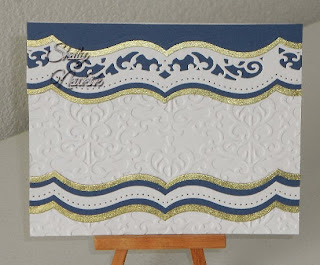
Playing With A2 Borders


The above is done on a polished stone base.
 A different look with a K & Company paper as the base.


Thursday, November 21, 2013

Color, Texture and Die Cuts

 Begin with a plain white card base.
The next step is to pick a texture that matches
the die cut.
The embossed texture piece covers the whole card front.
 The die cuts are Spellbinders A2 Borders.
 I did a lot of careful placement of dies, usually
taping them down.
 I applied the glue in most cases with a toothpick.
I would suggest making the die cuts at least 5.75 wide 
trimming to fit after the card has been totally put together.
It was a lot of fun to play with the various colors,
some came out very vibrant and others were very subtle.

Friday, November 15, 2013

Operation Write Home

 These cards will be going to Operation Write Home.
 Operation Write Home sends hand crafted cards to our
troops over seas.
 I hope that these sentiments are generic enough and
yet meaningful enough.

Monday, October 28, 2013

Thirds Christmas

 All printed papers came from the same DCWV stack.
Stamps unmounted and unknown.
 Snowflake was heat embossed using a Peacock 
embossing powder.  Source unknown.
Phrase stamped in is Stream from Rangers Adirondack line.

Reverse Tri Fold Christmas

 Cut paper 5.5 X 8 inches.
Score at 2, 3, 5, 6 inches.
 The pretty metallic gold border was
cut with a Spellbinders die.
The blue Merry Christmas is from CTMH.

Blue paper is DCWV.
Red and green paper is from K & Company.

Pine Branch Christmas

 Pine branch and pine branch border are die cut.
The ornaments and the Merry Christmas have
been die cut and painted with gold glitter nail polish.
The stripe texture was done with an embossing folder.

Snowflake Christmas

 Blue pearl paper over white card base.
Snowflakes are silver gift wrap that has been
spray glued to light weight card stock and die cut or punched.
 White pearl paper over plain white card base.
The snowflakes are blue glossy gift wrap that has 
been spray glued to light weight card stock.
Die cuts and punches were used for the snowflakes.
The same white pearl paper but with silver
snowflakes.

Wednesday, October 23, 2013

Chalked Embossing

An embossing folder that has had the raised parts chalked.
Add some Viva Pearl Pen accents
and a Cheery Lynn butterfly and you have a 
great card.

Thursday, September 26, 2013

Another Fancy Fold Card

The base for the card is a piece of card stock that is
5.5 x 6.5 inches that is folded in half.
Since this is an A2 card (5.5 x 4.25 inches) when the
black oval was place I had it on a cutting mat that had
a measuring on it.  That way I could place the oval 
so that the card was 4.25 inches.

The black and white floral base is stamped in black in
and layered over black card stock.
I think the stamp is from Stamp Camp, but am not sure
as I have has it for a long time.


Ready To Print Freebies

I have been trying to put ready to print phrases on this blog.  I use them a lot on my cards and really wanted to share them with you.  I have had a few glitches along the way.  I am still working on it and hope to have it all figured out soon.

When it is actually up and working correctly you should be able to click on the phrase that you want, this you will go to a place called Drop Box and in Drop Box it will say DOWNLOAD.  When you click on download a Word document should open up or you may have to open it in your download. 

The document will usually have two columns with 8 to 12 of the same phrase or scripture.  You should be able to save this to your computer to use over and over.  If I can ever get it to work it should be fantastic. 

The last glitch came when I upgraded my ipad to the latest OS and it apparently erased everything that I had in Drop Box and File Box.  I was NOT happy.  So I am starting over.  It is a fairly simple process once it is figured out, but time consuming.

Thursday, September 19, 2013

Using Designer Paper, Stamps, Punches and Dies

 There are three version of this type of design for you to choose from.
The top and bottom have the entire card front cover with 
designer paper (aka DP or scrapbook paper), 
while the middle card has designer paper mounted
on a coordinating card stock.

In each card the strip phrase was printed with a long space
between the phrase so it could be cut and have the 
punched or die cut dark blue mounted on it.
Phrases are available and ready to print on the
right hand side bar under Ready To Print Freebies.  
Double click on the desired phrase,
then click on download and a ready to print Word document
should open up for you.
You can save these to your computer for use again and again.
 The gingham is stamped from Impression Obsession's
Cover A Card gingham stamp.  I LOVE this stamp.
It looks just like gingham.  It looks great stamped on 
a plain brown paper bag.

Tuesday, September 10, 2013

Vintage Truck

The truck is by Kitchen Sink Stamps.
They are a rather complicated to stamp, but the
results a well worth the effort.  This particular design
takes seven different stamps.  As you can see the
end results are fantastic.

The black layer is the first one on the card base.
I used a plaid embossing folder for the
masculine texture.  After that the clothe ribbon
was attached.

Now the truck image is die cut with a Spellbinder's
rectangle die.  It is attached to black and then red.
Each layer cut with layering rulers.

The phrase is also two different stamps
that are in the vintage truck set.
It has been stamped with VersaMark
and embossed with fine line black embossing powder.
It has been cut into a rectangle and layered over
black card stock.  A screw head rivet is placed
in one corner.

Thursday, September 5, 2013

Framed Flowers

Framed Flowers


1.  Cover a plain white A2 card base with lavender card stock.
2.  Sponge the edges with purple Distressed Ink.
3. Cut a frame using one of the Matting Basics dies that is slightly (about ½ inch) smaller than the card front and one of Spellbinders Label 29 dies. Center the label die inside the mat die and tape the dies in position, cut and emboss.
 Emboss with rubber mat.
     To create a 3-D effect I attach the flat part of cut up paper egg cartons to the back of the frame. 
4.  Using white card stock, die cut Memory Box’s Bella Bouquet.  I had to cut
     part of the die cut off to get it to fit inside of the frame.
5.  Place the flower die cut on a coordinating piece.  In this case I have used
     an alcohol ink technique called Polished Stone, done on glossy card stock
     for a background that does not overpower the die cut and provides
     good contrast.
6.  Cut the coordinating piece slightly smaller than the frame and attach
     to the back of the frame.
7.  Center the framed layers on the card base and attach.
8.  Lay the Memory Box flower die cut inside the frame.  I had to cut apart
     the die cut to get it to look right.  When you are satisfied with the look,
     attach the die cut to the background.
9.  Embellish the lower right hand corner with three shiny bling pieces.

For product to make this design and many other fantastic goodies please visit Classy Cards N Such.

Wednesday, September 4, 2013

Simple Sympathy cards

 These are pretty simple and basic cards.  
I get requests for sympathy cards so have been making
a lot of them lately.
The top one is over DP (designer paper aka scrapbook paper)
The Spellbinders Filigree die cut was done
in pale pale green.
The phrase is also a Spellbinders die.

The bottom card has a brown textured layer
over the card base.
The die cuts used a Spellbinders.

Tuesday, September 3, 2013

Elegant Sympathy Card

A very very simple and yet elegant sympathy card.
Black and white is such a striking color combination.
A DP was cut to 5.25 x 4 and layered over black, then attached to 
a plain white A2 card base.

The phrase was computer generated, cut with a
Spellbinders oval and place on another Spellbinders die.
Simple, easy and elegant.

Saturday, August 31, 2013

Sympathy

White, beige and tan, a very subdued and elegant card.
The flowers are craft card stock and DP.
The corners were die cut.
Centers of the flowers are a brown Viva Pearl Pen.
The stamped phrase (Stampendous I think)
was cut in a rectangle and the corners rounded.
The beige DP layer under the phrase was
trimmed with a layering ruler and the corners rounded.

Friday, August 30, 2013

Little Card

 The computer generated phrase is available to you free.
Look on the right side of the blog under Ready to Print Freebies.
Papers used are from DCWV Citrus stack and 
Citrus card stock stack.
The little accents are made using a Viva Pearl Pen.

Monday, August 26, 2013

Call To Me


Call To Me

Classy Cards products used


1.  Place a piece of 5.50 x 4.25 inch white card stock in Spellbinders Whimsy embossing folder.
2.  Very lightly “kiss” only the raised portion with a sponge inked with a light brown or tan ink.  In this case I used CTMH Bamboo.  Attach to an A2 plain white card base.  (A2 = 5.50 x 4.25 inches, also called a quarter fold)
3.  Now position Spellbinders Label 29 in the exact center of a 5.50 x 4.25  inch piece of white card stock, tape into place, cut and then emboss with the rubber mat.
4.  Lightly sponge the outer and inner edges of the newly cut frame with
     the same ink used on the embossing folder piece..
5.  Since I like the 3-D effect I have attached cut pieces of flat from a
     paper egg carton to the back the frame.
6.  Attach the frame to the card base.
7.  After lightly sponging your greeting with the same tan or brown ink,
     it too is 3-D’ed with flat piece of egg carton and glued inside the frame
     and over the embossed piece.  In this case the greeting is a scripture
     that I have created in PSP X and cut with a Spellbinders Nesting
     Rectangle.
8.  With plain white paper again, cut one of Cheery Lynn Designs butterflies
     and the angel wings that go under the butterfly.
9.  With that same tan or brown ink heavily sponge the angel wing (liner) and
     lightly sponge the edges of the butterfly.
10.  Position the butterfly “artfully” on the card front.

Notes and comments – the same ink is sponged on all the pieces used in the design.  The design can be made totally in white with no sponging, but for my purposes here the sponging really helps show the layers and embossing.

The embossing with a rubber mat is not a must with the frame, but I find that it is one of those little touches that really adds a classy look the finished product.

Please visit Classy Cards N Such to purchase items shown on this card.  This card and other great designs can be found on the Classy Cards N Such blog.

The scripture is available to all who view my blog for FREE.  Check out the Freebies to Print on the sidebar to the right and just click on the freebie you would like to print.

Thursday, August 22, 2013

Playing Washi Tape

 Here are two examples of using Washi Tape.
As you can see there is an embossed layer that
is the first layer on the white card base.

The rectangle that is cover with Washi Tape is
raised over the card using flat pieces of paper egg carton
to create a 3-D effect.  

The phrase is computer generated.
Here is a link to the Word document that will allow
you to save this phrase and print it up to use.

The phrase is also 3-D.
I like both versions of the design.

Wednesday, August 21, 2013

Using Washi Tape


Washi Tape

Classy Cards products used
Washi Tapes  (all “Trendy” or Washi tapes are found in embellishments)

1.  Begin with a basic white card base.
2.  Cut a piece of white card stock slightly smaller than the card front.
     About 5.25 x 4 inches.
3.  Place Trendy Tape on the piece of card stock at an angle.
     Leave space that is “untaped” at the upper left and lower right corners.
     The ends of the tape can be folder over the edge of the paper or cut off.
4.  A small greeting can be stamped in either of the above corners.
5.  Attach to the card front.
6.  Cut a piece of black card stock the exact same size as the card front, which
     is 5.50 x 4.25 inches.
7.  Using one of the Spellbinders Matting Basics dies create a simple frame.
     Place the die in the center of the black card stock and cut.  The size of the
     die will determine the width of your frame.  The smaller the die the wider
     the frame.
8.  This step can be skipped if so desired.  I like the 3-D effect created by
     attaching flat pieces of egg carton to the back of the frame. 
9.  The frame goes over the Trendy Tape (also known as washi tape) piece
     that is attached to the card front.
10.  On the lower right corner of the frame attach three small gun metal
       pearls.


Friday, August 16, 2013

The Lord Goes Before You


The Lord Goes Before You

Classy Cards products used in this design

1.  Cover the plain white card base with a soft colored DP that has no distinct
      pattern.
2.  Position a Spellbinders Label on white card stock.  Tape in place with low
     tack masking tape.  I used Spellbinders Label 9, but any Label die will
     work.
3.  Place a Spellbinders Oval die inside the Label.   Tape in place.  Cut.
4.  Do not remover the tape, but place the soft embossing mat under the dies
     and emboss.  You could also place the frame in an embossing folder for a
     different look.
5.  Turn the frame over and on the back side attach pieces of flat egg carton
     to create a 3-D effect.
6.  The scripture has been computer generated.  Die cut it using the oval die
     that is just enough bigger than the oval aperture to hide the edge of the
     oval.
7.  Sponge the edges of the oval scripture with a Distressed Ink that will
     coordinate with the DP that is covering the card base.  In this case it is
     a purple ink was used.
8.  Attach the frame to the scripture oval.  Center it on the card.
9.  Die cut 2 Anja Leaves and position where desire on frame.
10.  Add several flowers that will coordinate with your DP and sponged ink.
11.  Use a Viva Pearl Pen to put lovely centers in the flowers.


Sunday, August 11, 2013

Easy Framed Foliage Card


A very simple framed card that is so easy
to make.  I have used Spellbinders


Above you see how I arrange my dies for the
frame.  I have two examples using the Matting
Basics.  The first is slightly wider and has been
textured in a Spellbinders M-Bossabilities EL-009
Flora embossing folder.

The other frame has been embossed using
the Matting Basics dies themselves.
I leave the low tack painters masking tape
on after die cutting and run it
through the die cut machine again, using
the soft rubber embossing mat.


Once the Spellbinders Foliage leaves have
been cut and embossed I use the flat
portions of paper egg cartons to create
a 3-D look.  You can cut that egg carton
to any size AND you are recycling.  It’s fast,
easy and makes your husband look at you
strangely. (oh dear, what is she up to now?)


The foliage die cut on this card is from

The background is made with Glimmer Mists
and a stencil.

Please visit Classy Cards N Such to purchase these products.
For more great ideas Classy Cards N Such has a blog.
It has fantastic ideas that will spark your creativity.