Thursday, December 31, 2009

Butterfly Collage Stamp


The card base of this design has been covered with scrapbook paper and the edges sponged lightly with a dark brown ink.
Spellbinders made the die for the die cut on the right side of the card. It was cut and embossed, then lightly sponged with dark brown ink to accent the embossing even more.
I can not tell you who made the stamp. The butterfly itself is accented with a clear sparkle gel pen to pop the butterfly image in the collage. The square edges have been distressed with a thread cutter and then heavily sponged with black ink to give a burned and vintage look.

Tuesday, December 29, 2009

You Answer Me


Layers, wow, do I like to use layers! I used the parts of the pendant that are cut out and made them accents. Spellbinders Label and Pendant dies were used. The papers are from DCWV Tahiti stack and the stamped phrase is made my Our Daily Bread Designs.
The stamped phrase has been accented with a white pen.
A black card base was used. More to come, I am still creating with my paper, stamps and dies.

Monday, December 28, 2009

Die cuts, stamps and paper


With some great dies, high quality stamps and gorgeous paper you can create so much. Dies by Spellbinders, stamps by Our Daily Bread Designs and papers by DCWV.
The pieces on the far left and right are a Spellbinders Borderabilities that has been cut in half. I do like the framing effect that it gives.
Hope this has inspired some of you. I have certainly had a great time creating with these tools.

Saturday, December 26, 2009

Everything Beautiful


Oh, oh, oh, oh........I have been having sooooooo much fun. Our Daily Bread Designs stamps that I got myself for Christmas. (yes, I was a VERY good girl, just ask Santa), Spellbinders Labels and Pendants dies and DCWV Tahiti stacks.
The perfect adhesive backed half pearls are from Creative Impressions. This was a very fun and elegant card to create.

Friday, December 25, 2009

Faux Lace


A few weeks ago there was a video on USArt Quest on making faux lace. Double sided tape is laid down on the card stock. You can tell from the pictures of the cards that the rows of tape were fairly close together. I had to try several kinds of double sided tape before I found one that would "roll" when I rubbed over it.

I rubbed over the tape going both directions. Next was a mica powder that I dabbed on here and there with my finger. After that I put some metallic flakes on and rubbed off the excess with a stiff brush. To get rid of that finally little bit of tackiness a sparkly embossing powder was applied and heated.

The die cuts are from Spellbinders Label Series. The texture is from a Cuttlebug A2 Embossing Folder.

This is a fun new technique that is easy to do and impressive when finished.


Thursday, December 24, 2009

The Last of the Christmas Cards


I was sorting out my stash of cards and found some older cards that I had done. The red and black card was so dramatic and elegant. I think I need to use my mulberry paper more often.

The collage stamp was used over a Glimmer Mists shimmery background. Sadly the pictures just can't do justice to the beauty of the Glimmer Mists. The stamp is unmounted and I have no idea who is the maker.

A piece of scrapbook paper attached to the front of a card base, an evergreen tree embossed with green sparkly embossing powder and a Christmas phrase. A quick, easy and elegant card.


This is a window card. The snowflake is a Sizzix cut and emboss die. Two snowflakes glued together with the fishing line in the middle. The frame hides where the glue has been applied to hold the snowflake in place in the window.
The phrase is computer generated. I have no idea who is the maker of the snowflake stamp. Another of those purchased years ago at a convention as an unmounted.

Tuesday, December 22, 2009

Let It Snow


Since I know very well that I can't prevent the coming predicted snow I have decided to be happy about it. Okay, not happy, but at least accepting.

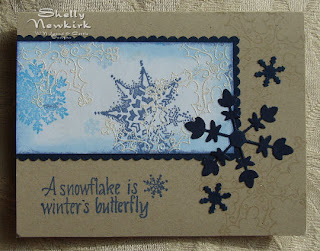
Here again the Spellbinder's Impressibilites was used to create the raised snowflakes. The raised image was lightly brayered over with a medium blue ink. The oval, scalloped oval and the dark blue border on the right of the card to the left were all from Spellbinders dies. The dark blue snowflakes are from various punches and die cuts.


The second card is the same Spellbinders Impressibilites. It has been layered on dark blue and white then mounted on a meduim blue card base.

Saturday, December 19, 2009

Even More Blue Snowflakes


Cut up a dry embossed panel into three rectangles, mount them on some K & Company paper from the latest Christmas stack then layer onto dark blue. Dark blue ink was sponged around the edges.

A second example of my blue snowflake frenzy is also in this post. I created the multi-shaded various blue snowflake paper. You can read the basics of how it was done in yesterday's post.


Friday, December 18, 2009

More Blue Snowflakes


The white and dark blue card stock layers have been die cut with a Spellbinders Labels die. Now that white card stock has been a little "altered". I got out my snowflake stamp collection and went a little over the edge. (aka - out of the box) I also used some white sparkle embossing powder for one snowflake. There are also die cut and punched snowflakes floating around on it too.
The label was cut in half so there are two cards. Note the epoxy bubble over the snowflake on the phrase. It is left over EnviroTex from my last Friendly Plastic session. I used Crafter Pick Ultimate glue to attach it.

Thursday, December 17, 2009

Blue, Tan and White


This color combination and the use of snowflakes was inspired by my stamping friend's blog. Carol Norby has a blog called Stampin Hot In Arizona and it is a "hot" blog. Carol has some great ideas, so stop by her blog and be inspired.
The shades of blue paper used here is from K & Company. I stamped one of my many snowflake stamps on the paper and embossed with a sparkly blue embossing powder.
The Sizzix die cut snowflake is dark blue cardstock. VersaMark ink was brayered on then holgram embossing powder was used.
The ink used on the rest of the stamped images is Blue Iris Chalk ink.

Wednesday, December 16, 2009

Glimmer Mist Background


The stamp used here is a background stamp, but is now the focal point of the card.
I used Glimmer Mists to create a shimmery background, then stamped the Merry Christmas stamp with VersaMark and embossed with fineline black.
The layer in is black, gold gift wrap and a nutmeg brown. A white card base was used.
So background stamps are not just for backgrounds. Hmmm - I have been told by an authority that a true crafter disregards all the rules and voids all the warranty's when they are truly creating. Yup, I agree.
AND boy is it a lot of fun.

Monday, December 14, 2009


All three cards were created using Spellbinders Impressabilities. These are amazing embossing templates. They can be used as I did as a whole or cut apart.

When using any type of embossing plate or folder I would recommend that you use some type of "softener" for the paper. My preferred product is Wonder Goo. You can also spritz or mist lightly with water. This gives a much crisper finished product.


The Merry Christmas was stamped on the first card before embossing. To make the embossed snowflakes stand out even more a brayer inked with light blue dye based ink was used.
Best brayer method, a very very light touch. This keeps the brayer on top of the embossed image. I just hate it when the brayer inks the valleys.
The second card has layering and a punched out glitter snowflake that has been encased in EnviroTex resin.


This third card has an added snowflake that is covered in metal flakes. The layering here is very basic. A little darker blue ink was used to enhance the embossed snowflake design.

Thursday, December 10, 2009

Nativity Card


What a fun card to make? I had to save just one to look at all through the year.
This is a die cut set from Quickut. I have no idea if they are still selling it. I got it over a year ago.
The card base is a tan with a mountain scene stamped in a tan that was several shades darker. I did use a gel sparkle pen on the star.

Monday, December 7, 2009

Beautiful Little Girl


Another stamp by Second Star On The Right. The stamped image did not turn out well when I reduced the size of the photo.
The die cuts are from Bosskut. The card base is paper from a DCWV (Die Cuts With a View) stack called Old World. The three pearls are from Creative Impressions.
The edges of the card base and the oval stamped image have been sponged to give vintage look and to add depth.
I usually stamp the highly detailed "art" stamps on glossy paper and put the ink on the stamp with a brayer.

Saturday, December 5, 2009

It's Christmas Time Again


The front of the card base is covered with scrapbook paper. The edges of the card have been sponged with dark green ink.


Stamp credits - phrase by Paper Impressions
I can not find this company on Gingerstamp.

Gingerstamp is a website with a very current links to most current stamp company and accessory websites. It is a wonderful resource.

pine bough - PSX Personal Stamp Exchange - the date on the stamp is 1996, I have had this one for a while and it is still a favorite.


The phrase is stamped with dark green ink. The pine bough is embossed with a dark green sparkle embossing powder.


Now for that fancy edged white cardstock piece that has the phrase stamped on it. (please note that the edges are sponged with dark green ink) Sigh, you are going to hate me for this little bit of enabling. This fancy edge has been done with a set of two punches from EK Success's Martha Stewart line. They are called Punch Around The Page. I love the product. The set runs about $25 - $27. I found mine at Michael's and had a terrible time deciding which set I wanted. There are some fantastic punches in this new line. Get out your coupon cutter cause you are going to want all of these, they are unlike anything else out there.