Friday, January 23, 2009

Simple and Quick Happy Birthday


This is a post card. I had cut out all these parts, started playing around with my new QuicKutz Happy Birthday die and put them all together. So there are the results.
The long green rectangular background and the white scallops are a Spellbinders Nestabilitly die set. The happy birthday is a brand new die that I got at the Treasure Box Scrapbooking store in Ft Collins CO. (love, love, love that store, if it's new and fantastic, they have it) That lovely flourish is made by Bosskut.
Very fast, very easy card that has a certain elegance.
This same design would be stunning with a polished stone or Glimmer Mist background in place of the plain green. Often less is more.

Wednesday, January 21, 2009

Definitely a Man's Card

This is a card for a man. My husband even liked it!

The train image is by Uptown Rubber Stamps, which no longer exists as a stand alone company. It has been stamped with black pigment ink and the embossing powder is black fineline.

The phrase is printed on inkjet transparency.
It is: "When a train goes through a tunnel and it gets dark, you don't throw away the ticket and jump off. You sit still and trust the engineer. ~Corrie Ten Boom"

The card base is plain white cardstock. I seldom work directly on my cardbase. I have seperate pieces of cardstock cut that are the same size as my card base and work on those. Many of the techniques I use will warp the cardstock and I have found that using a seperate piece for the card front and then gluing it to the base allows me to place the finished piece under a heavy book to dry. The finished product is very flat and crisp in appearance. This is one reason I seldom use double-sided tape.

A Spellbinders Rectangle Nestibilites die was used to cut the opening in the card front and the card base at the same time. Open the card up, place the card front over the open cardbase and hold the two firmly together with low tack masking tape. Pick a rectangle that will fit the size of the transparency, position on the two layers, hold in place with low tack masking tape and run it through your die cut machine.

Now use the same Spellbinders Classic Rectangle Nestibilities die and one a size larger and cut TWO frames of plain brown card stock. These can be held in place on your paper with that lovely low tack masking tape too.

I glued the transparencty in place on the card base. Then glues the base and the front together, matching up the rectangular openings. Now make that transparency stand out a little by attaching one of the brown frames.

You will have an inked piece that has been cut out from the card front. Carefully position in inside the card base so that is shows through the transparency and glue in place. The second frame can be glued around the inked cutout.

The finishing touch was a sponging of brown inks around the outer edge of the card.

The vintage flourish card front was created using Distressed Inks by Ranger. I used the ink pad to pull ink across the entire card and create a scratched wood look, then stamped flourishes with various shades of brown. The final step was to heavily mist the entire piece to cause the inks to "fade" and spread out. Giving a worn faded vintage look.

I think I like these inkjet transparencies!!!! Wild Women of the West Stampers - give it a try.

Basic Stamper Tip: Low tack masking tape is a must have for stampers. I use the lavender low tack masking tape from Walmart. Only under the most extreme pressure will it adhere to card stock tightly enough to pull a layer off when removed. The only die cut machine that can apply that much pressure is the Wizard by Spellbinders.

Sunday, January 18, 2009

B Line Designs


I had the priviledge of spending Wednesday through Saturday in the Denver area. One of those days was spent playing with the Basement Babes at the home of Jen Lowe, aka JLo.

We all helped Susan Mostek design cards for B Line Design Rubber Stamps. To view those fantastic cards visit the B Line gallery.
The picture to the left is of "The Babes".


Monday, January 12, 2009

Scenic Winter Cards


My stamping pal, Bettye S., had a stamp that she just could not do anything with. She gave it to me to play with several months ago. It has been sitting out in my studio, staring at me for that time. Finally today I had an inspiration and several ideas. Here are two that actually worked. I just love it when the vision in my head comes together and looks good as a card.

The stamp is by Creative Impressions. I am not the greatest colorist in the world, so I knew that was not going to be the answer. On both cards the image is stamped on light blue cardstock with Clearsnaps Colorbox Fluid Chalk Blue Iris.

With the first card I highlighted with Ranger's Inkssentials white gel pen. By using the pen at the same angle over the whole card, a 3-D effect is achieved. The finishing touch was Sizzix's Sizzlet

Architectural Corners in navy cardstock. These are glued down with Crafters Pick Ultimate Glue, applied to the back side of the die cut with a toothpick.

With the second card, I went crazy with a silver glitter pen. The well glittered image was then mounted on navy cardstockand trimmed closely.

One of my favorite accents with cards is metallic gift wrap. In this case it is a brushed metallic silver. Double sided tape was used on the card base, the gift wrap attached. I then turn it over and use a scissors to trim the gift wrap to the exact size of the card base. The card itself provides my guide for a clean straight cut.

Enjoy Bettye and thanks for the challenge.

Friday, January 9, 2009

Silk flower card


Here is that same scrapbook paper again. It truly looks like material.

I took apart a silk flower, reassembled and put a rhinstone in the center. The leaves are all cut down from the original size.

Swirl die cut - Sizzix
Heart die cut - Bosscut

Butterfly Kisses


The mediallion punches can be used to make a great side bar. This one is punched three times, layered on scrapbook paper and then layered again on the same plain burgandy paper. I used a decorative scissors to finish.

The stamps are by Sugarloaf Productions.
I have no clue as to the maker of the scrapbook paper.

This type of card is fairly fast to make, yet has a certain elegance to it.

Other embellishments that could be added would be: brads in the center of the mediallions, brads or glitter glue on the butterfly wings. You could sponge around the outside edge of the card with a burgandy ink to add some depth.

Wednesday, January 7, 2009

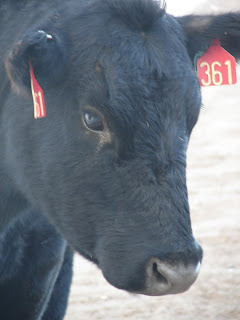
Meet A Cow


I live on a ranch. That means there are cows. We raise
a breed called Black Angus. This particular cow is a
very nice one. She was not at all threatened by me
and even graciously stood still long enough for me to
take this picture.

Blessings


I do love this paper. It looks so like real material. You can even see the "weave". I have no idea what company manufactured it.
I lost the front cover and never dreamed I would have a blog and want that information, so was not terribly worried about it.
The frame has been cut using a Spellbinders nesting dies. The paper in the frame is from the same stack as the paper on the front of the card base. That is one of the major reason I like to buy stacks of scrapbook paper. All the paper in the stack will coordinate.
The flouish is a Sizzix extended cut die. "Blessings" is a sticker I got from Serendipity Stamps.

Monday, January 5, 2009

Punches, Die Cuts and Stickers

A new Anna Griffin punch inspired this little creation.

The beginning was a piece of scrapbook paper glued
to an A2 card base. (A2 - 4.25 x 5.5 when folded)

The die cut is three repeats of the same die cut that
were carefully cut apart and reassembled to cradle
the "Prayer" sticker.

I punched out the cross and then centered it in
an oval punch. Two narrow strips of the same
paper at the top and bottom of the card provide the
finishing touch.

Sunday, January 4, 2009

Hereford Bull Card


This image by Sutter Enterprises is stamped in dark brown ink. There is a very light chalk application of green on the bottom and blue on the top.
The edges of the white card stock are sponged with the same dark brown ink that was used to stamp the image.
After the photo corners were applied, I glued it to a medium brown cardstock and then to a dark brown cardstock, trimming the dark brown with a decorative scissors.
The card base is a beige parchment, which is what I use for most of my western cards.

Take a picture


These four cards are all photos that I have taken in the last few years. My camera is usually with me when I am out wandering or working in the pastures and fields.


I have only seen this type of cloud and light formation once and am still in awe of God's handiwork.
He is an awesome God.


I have kept the mounting of these photos on the card base as simple as possible. The desired focal point is the photo and I did not want to distract from it.


The two punch set used for the mounting of the photos are by EK Success. They have a very good product that has no trouble punching through cardstock.


Wow, the colors and the cloud formation are so stunning. Awesome, just awesome. I have tried and tried to match these colors with inks or chalks. It looks fake!!!!
Only God can do it right.

Saturday, January 3, 2009

Western Card


I have a weakness for western stamps and western style cards. Now I want you to note here, I said WESTERN. Not southwestern and not Indian. I am fond of the working west cowboy type stamps like the image on this card.
You can find a gold mine of this type of stamp at Sutter Enterprises. I have a lot of their stamps and find them to be high quality, deeply etched rubber on beautiful wood mounts. They can be ordered unmounted, but the wood is so lovely that all of mine are mounted. They just came out with some new stamps in Dec.
The mounted cowboy and the barbed wire are both from
Sutter Enterprises. The cowboy is stamped in dark brown and the wire in dark grey. The die cut corners are Quickutz.
It is a little hard to see in this picture, but there is a touch of blue chalked in on the upper portion of the picture and green on the lower. The edge of the first white layer that is stamped on has been sponged with dark brown and this could also be done around the card base if so desired. A decorative scissors was used on the dark brown cardstock layer.

Thursday, January 1, 2009

Have a great Picture???


Have you ever taken a really great picture
and wanted to share it???


Here are a couple of mine.


In our old log house we have the very tall and narrow
deep set windows. I set an old childrens toy chest in
front of one of these windows that looks out on the yard.
I put shelf liner over the entire top of the toy chest and
then an old bath towel over that. Our doggies spend many
houses gazing out that window. I know immediately
when someone drives in. Diesel and MacDuff are
our early warning system.


This is a picture that I took of Diesel several Christmas's ago. You can tell just how much he likes his Santa suit.

Some ideas for picture cards are:

1. an old barn or house

2. sunsets and sunrises

3. flowers

4. kids